Final Outcome and Narrative

Here are my final 20 images from the walk around kendal town. These 20 images follow my journey through town, and each link with at least one of the themes.

  1. Theme: People

DSC_0010


2) Theme: People

DSC_0011


3) Theme: Decay/Nature

DSC_0016


4) Theme: Nature

DSC_0019


5) Theme: Architecture

DSC_0025


6) Theme: Architecture/Decay

DSC_0027


7) Theme: Architecture/Nature

DSC_0026


8) Theme: Architecture/Decay/Nature

DSC_0034


9) Theme: Architecture/Decay

DSC_0036


10) Theme: Architecture

DSC_0040


11) Theme: Decay

DSC_0052


12) Theme: Decay

DSC_0054


13) Theme: Decay

DSC_0055


14) Theme: Nature

DSC_0061


15) Theme: Decay

DSC_0066


16) Theme: Architecture/Decay

DSC_0069


17) Theme: Decay

DSC_0080


18) Theme: Nature

DSC_0084


19) Theme: Decay

DSC_0086


20) Theme: Decay

DSC_0097


Here is a map that shows the route we followed and where each of the final 20 images were taken at.

image


I think I did really well creating this narrative, as I featured a large variety of different images, all of which were from at least one of the themes. I also followed a route within the correct boundaries and completed the task within the given time. I did not need assistance, and fully relied on my own knowledge to adjust any and all settings on my own camera. I also offered my own knowledge of DSLR cameras and compositions/scenes to help the other members of my group to capture shots to do with their themes, therefore altering and teaching them about different camera settings and what they do. I really enjoyed this task, because actually doing a photography practical outside of the campus was really enjoyable yet challenging for me. I found it challenging because I had to look at the environment around me differently to how I usually would because I had to pick out the themes within the town.

After taking these photos, it then came time to edit them. I took my images in a RAW format, therefore I had to take them home to use on my own computer. I had to do this because the college MAC PCs refuse to work with RAW files. A RAW file is an image as the cameras sensors sees it. It is a completely raw image, that hasn’t been altered, unlike JPEG images which get altered by the camera, where the resolution is reduced and purity is damaged. Therefore a RAW image can be processed to my own liking. Each image has had the brightness altered, therefore being slightly lighter or darker. Images with buildings or metal as the main focus have had the clarity increased which creates a more contrast on the subject.  All the images also got sharpened, because RAW images are slightly soft before they are edited.

Choosing the final 20 images was a fairly easy process until the final 25, then I had to select them carefully to make sure my journey could still be identified, with the lack of images to fill up the route, as well as having to choose between my favourite images from the walk.

The Practical – Photography Challenge

Today we did our photography challenge. This entailed going around Kendal town and taking photos of a variety of subjects. We were specifically asked to choose one of the following themes to follow; Nature, Architecture, Surface Pattern and Texture, Decay, and People. However, after starting the walk, I then began to realise some of these themes link together such as Nature and Decay. I started out following the theme of people, but then I started to get conflicted about whether portraiture was going to be a good choice for this walk. I started to take photos of decay, nature and architecture. As I completed my journey, I had taken photos within 4 out of 5 of the themes; people, decay, architecture and nature.

At the start of this walk, we didn’t specifically have a route through town planned, however all three of us in my group know our ways around kendal very well. We chose to avoid the main streets of town, as that was the place most of the rest of the students would be, and we wanted to get more unique shots as we know the whole town so well. Going around the outer streets of town we wove between the different yards trying to follow our themes. Going along Stramongate Road, Blackhall Road, and Lowther Street, then up and cutting across town to behind M&S, into Maudes Meadow, back via town and into Blackhall Yard and across Batman Bridge back to college.

After changing my theme, I was inspired to take photos of a variety of subjects, such as; different forms of fungi, buildings, decay, and alternative views of general objects and structures.

I really enjoyed this task because I am passionate about photography, and I am keen to have a camera in my hands at all times. I enjoyed the freedom of being able to travel around town and capture images of all kinds of themes. In some ways I found this task quite difficult because it was tough to get such shots that I was imagining. Natural unstaged images are really difficult to get in a busy town, as there are so many people watching what I am doing. This then creates an issue that a lot of people avoid being featured in candid shots, therefore, an uncomfortable expression and vibe occurs in a lot of portraiture images. Along with people, it is also difficult to capture different types of decay without it getting repetitive for the viewer.

In this task, I worked in Manual Mode (M on the Mode Dial). I always work in manual mode as I find it easier to have full control of all my setting on my camera. I set my ISO to 200 and left it at that for the whole walk as it was mainly cloudy, but it was also very bright. I altered my aperture throughout the whole of the walk because depending on the subject altered whether I needed a large or small focal field. Along with this I changed my shutter speed, depending on the colour and brightness of the subject I was photographing.

I frequently thought about composition, as I spend a lot of time looking at a subject and moving myself to find an alternative angle that looked good, yet gave a different perspective for an object. The only thing that went wrong during this was how I changed my theme, then found myself worrying about getting images from all 4 different themes, therefore when I got back to the classroom I would’ve had enough images for my final narrative. To resolve this, I tried to take images that could be used in 2 or 3 different themes which meant I was likely to take enough images for the theme I’d eventually choose. Although, after some thought, I found I was going to use all of my images to create a journey through town which features the 4 themes I had chosen, rather than choosing one theme only.

I think I have addressed the 4 themes quite well, although some images don’t feature every theme in them, they all contain at least one theme. I spent time thinking about each image before it was taken, therefore making sure I was making the theme was the main focus in each image.

I did use photoshop to edit my photos, however, I mainly used it to process the images from RAW to JPEG. I did also alter the exposure and brightness on some of the images, and then sharpened every image incase they are to be blown up and made larger in the future.

Here are all of the images I took:

Art Wolfe – Artist link

ArtWolfe_5x7_300dpi

Art Wolfe is an American Photographer and Conservationist. Born 13th September 1951 in Seattle, Washington. He is best known for colour images of landscapes, wildlife and native cultures. His images capture scenes from every continent, which have been noticed by environmental groups that have noted the images for their stunning visual impacts.

Throughout his career he has released over 65 photobooks, which contain instructional DVDs of photographic techniques. He was born into a family of artists, as both parents were commercial artists in Seattle. Wolfe graduated with a Fine Arts degree from the University of Washington. After graduation, he also got involved with National Geographic magazine.


Wolfe is a landscape and nature photographer. He captures the beauty of these subjects using a variety of techniques. He uses polarisers in most of his images,  long exposures and a large depth of field.

Les Aiguilles (Chamonix Needles), Alps, France

Wolfe has used 2 techniques in this image, a polariser and a large depth of field. The polariser is used to create darker skies, and manage glared and reflections from the surfaces of water. The large depth of field has been used to focus the whole scene. I like this image because there is contrast between the places where the snow has melted, and where it is still visible. As well as contrast between the blue skies, and sun breaking out on the peaks.

I love the reflection in this image of the mountains. The image is crisp clear and could be rotated upside down and it would still look like the same image. I think he has used a Digital SLR as there are many components to this image that will require the skill of one. Wolfe is also a contemporary photographer, therefore he uses more modern equipment.


King Penguin, Bay of Isles, South Georgia Island, UK

This image has also used a polariser, however it only darkens the sky in this image, rather than managing reflections in the water because there are no reflections to manage. I really like the composition in this image where the penguins are all in full movement onto land, but only just hitting the shore all at the same time. I like the contrast between the dark and stormy looking sky, yet vibrant and peaceful blue waters.

A fairly fast exposure has been used as the penguins are in sharp focus, and a large aperture to again focus the whole scene.


1600

This image caught my eye because of the large depth of field from the foreground flowers to the furthest mountains. I also like the range of colours in the image of blues, reds and greens. I don’t like the composition of this image as I feel like the flowers have been cut off, when I think more of the stems should be showing. It seems like their could be more content visible showing more beauty of these flowers.


Southern most point of Africa, Arniston, South Africa

I chose this image to look at also because this is the kind of image I would take. I am not a landscape photographer, however I happily take photos of landscapes if it features long exposure opportunities, like this one. The sea is blurred and has a cloudy look because Wolfe has used a long exposure which captures movement in the image. I really like this image because there is a lot of depth and contrast in the colours and tones.

Planning Amys Photography Challenge

Today we started our 3rd and final mini brief of the capture project. This mini brief is called Amy’s photography challenge. Within this challenge we have been set the task to create a narrative using street photography. Street photography contains a variety of aspects, from people and architecture, to nature and decay.

We created a mindmap as a class which explains the brief, 2 artist links, health and safety for the walk, and themes of the brief.

The brief is to go into Kendal town centre, in groups of 2-4 using a map for a maximum of 2 hours, taking photos using a theme of my choice. The journey has to be traceable via the photos and the map. I can take as many photos as I wish, however only 20 photos will be used in my final narrative. Here is an image of the map we are going to be using:

image

We then briefly looked at 2 artists; Art Wolfe, a contemporary American landscape photographer and conservationist. And Henri Carter Bresson, a historic French street photographer, who is considered a master of candid photography.

The health and safety for this walk is mainly based on the public and how we, as college students, present ourselves. As well as dangers of our surroundings.

  • Crossing roads – Be sure to use a crossing point at all times. Do not just run across roads.
  • Out of bounds – We are not to go out of where is marked on the map. This therefore means our tutors know where abouts we will be, if they need us.
  • Thoughtful of behaviour and public interaction – Minimise bad language generally and be polite towards the public. If someone shows discomfort if they are captured in one of my images, I am to delete it or speak with them till there is comfort on both parties.
  • The river – do not go down to the river side as the river is strong flowing and could potentially be dangerous.

Themes

  • Nature
  • Architecture
  • People
  • Texture and surface pattern
  • Decay

After we did this mapping sheet, we were then asked to create a mind map with each theme as a heading, and listing beneath potential photographic opportunities we could face with these themes in town. Here are these lists:

Nature

  • Trees/leaves
  • Animals/Wildlife
  • River (long exposure)
  • Tree roots

Architecture

  • Church
  • Town hall
  • Multistory carpark
  • Rooftops
  • Alleyways

People

  • Shopping Rush (long exposure)
  • Portraits
  • Figures
  • Busy feet
  • Shopping bags in hands

Texture and surface pattern

  • Cobbles
  • Bricks
  • Fence/Gate

Decay

  • Rust
  • Rubbish
  • Leaves
  • Torn posters


I have chosen People as my theme for this small project for a variety of reasons. First of all, I am a keen people photographer. I have spent a lot of my photographic journey so far taking photos of people, mostly candid shots. This is a good thing for me to be able to use in this project because a lot of the images I will be taking are to explain a journey. I dont want to set up posed images, as I’d rather capture the natural expressions of the public around Kendal. Another reason I chose the People theme is because I think there are going to be more opportunities of people, than any of the other themes.

Here are 10 images I have found on google images that represent people and street photography:

Old Man in Maidstone

I chose this image because I really like 3 aspects of this shot. Firstly the characteristics of the male in the image, he has a vibe about him, not necessarily rebellious, however he has an edgy side to himself which makes me think he may be quite a lively person. Another thing I like about this image is the shallow depth of field. This is because he stands out clearly and theres no distraction or background pollution to take attention away from him. The final thing that stands out to me in this image is how the photographer has placed him off centre. This is a general technique which is highly effective as its slightly following the rule of thirds and isn’t too strongly structured.

street-photography

I chose this image because I like how there is a deep contrast between the birds on the floor and the bird flying. I like how the bird flying is highlighted and the light has caught it, where as the birds on the floor are dark and silhouetted. I like this because it seems like the bird flying is positive and free as it is so light, and the birds on the floor are more negative. I also really like the light rays that are breaking down onto the scene.

street-photography-gear-07

I like this image because

street-photography-600x450P42600051maxresdefaultmainblack and white street photography Ivan Casan_1

SONY DSC

9-street


Introduction to photography

Today we began a photography workshop. This lesson entailed an introduction to photography, how a DSLR camera functions, and then we were some set tasks.

Photography is the art of capturing and processing photos. (Google definition). The images are created by recording light either electronically on an image sensor, or chemically using a light sensitive material like photographic film.

DSLR Cameras

We went through a presentation as a class, where our tutor Barry gave us an in depth explanation on DSLR cameras and how they work. First of all we were shown all the different settings and buttons on a camera body.

sebagian-besar-fitur-desain-slr

Each of these settings and buttons have a key part to correctly composing an image as depending on how a camera is set up massively affects the image later created. Generally it is best to really get to know a camera through getting out and about and changing all the settings and watching how it alters the way the camera creates an image.

A camera works in a variety of modes, such as; Manual, Program, Aperture Priority and Shutter Priority. Along with scene modes which are used for a quick set up to capture an image, dependant on the requirements of the camera for the image. An example of this is sport mode – which will change the cameras shutter speed to being very quick, therefore capturing a sharp image. All of photography is based on light, and depending on the light levels then changes what can be achieved to specific standards desired by the photographer.

To compose and create a successful photo, there are a variety of different settings that have to be perfectly balanced, depending on the desired effect in the image. These settings are the shutter speed, aperture, and ISO. For a completely balanced, sharp daylight looking image, these 3 settings have to be balanced to bring out the correct exposure and light levels. However, if the photographer desires a certain effect on an image, then these 3 settings can be changed. An example of this is when a photographer wishes to captured motion within their image. To do this, the shutter speed has to be increased therefore the shutter is open for longer. However, opening the shutter for longer, allows a lot of light to enter the camera, when this happens usually over exposure occurs, to then correct this, the aperture and ISO come into play. The aperture can be increased therefore making a smaller hole for the light top enter through, this will bring down the exposure on the image. Also ISO can by increased which then alters how sensitive the camera is to light.


After briefly going over how a camera functions, the class was then set a task to go out and achieve a variety of images using certain settings. Here are those images and a brief explanation as to how I achieved each one:

Birds Eye View and Worms Eye View

A successful image is always improved by having a good composition. Birds eye view and worms eye view aren’t specifically popular photographic techniques, however they show how dramatic it can be changing a perspective.

DSC_0021DSC_0023

Rule of Thirds

Rule of thirds is another kind of perspective. It is a technique more frequently used compared to BEV and WEV. Rule of thirds is the process of placing objects within an image on a thirds line in the frame. Here I have taken 2 images, which both show rule of thirds. The first image straight up shows the vertical rule of thirds, however the second image shows both vertical and horizontal thirds. The cup is placed on the 2/3 vertical line, and the table is on the 1/3 horizontal line. Using the rule of thirds makes an image more pleasing to the visual eye.

DSC_0027DSC_0058

Long Exposure

Long exposure is when I decreased my shutter speed by letting motion be captured. The first image shows a student walking out of the college building, and I wanted to capture her movement. I was just experimenting, as I was walking at the same time, so I didn’t give the image too much thought.

The second image was of a car passing by the college, and I once again wanted to capture the motion. What would have helped would have been a tripod, which would have kept the background building completely still. This would have made the image much more effective, although I didn’t have a tripod to work with at the time.

DSC_0006DSC_0046


Motion Capture

In both of these images, movement was occurring, however I had used quick enough shutter speeds to capture still images without motion blur.

DSC_0008DSC_0010

Pan Exposure

Pan Exposure is the process of following a moving object with a open shutter, so it captures the movement of the vehicle by blurring the background but keeping the main object noticeable/sharp.

DSC_0028DSC_0035

Zoom Long Exposure

This technique is almost the same as Pan Exposure, however instead of following an object, it is the process of zooming in or out on an object whilst the shutter is open, so the movement of the zoom is captured.

DSC_0036DSC_0051

Macro

Macro is close up photography, capturing fine detail of an object or organism. Below are 2 image that were taken on my phone. The camera I was using, didn’t have a macro setting, therefore I was unable to take a macro image on my DSLR. However, the images below show what macro is, and the fine detail that can be caught in the image.

12788810_956142491100034_598510342_o12823161_956142527766697_1163468459_o

Depth of Field

The final task we were set was depth of field. This is the focal range the camera has. Depth of Field is altered through aperture. Below are 2 images I took, which show a shallow depth of field, where the objects behind the main subject are blurred, no matter how close they may be. If I were to have used a deep depth of field the backgrounds would have been in sharp focus.

DSC_0016DSC_0008


Cinemagraph workshop – Producing a Cinemagraph

Today we began a process of creating Cinemagraphs. This lesson contained a variety of aspects; learning what a cinemagraph is, learning the editing process of a cinemagraph with a pre-made video, and going out to film our own cinemagraph.

Cinemagraphs are still photographs in which a minor and repeated movement occurs. They are published in either animated GIF format or as video, and can give the illusion that the viewer is watching a video. (Google definition). They are usually used for advertising, promotional videos and as a marketing tool.

GIF = Graphics Interchange Format

A Cinemagraph differs to a GIF through for couple of different reasons:

  • A cinemagraph isolates movement within a video, whilst the rest is stationary, where as a GIF is a section of a video that is on a continuous loop.
  • A successful cinemagraph tricks the viewer into watching what seems like an infinite clip, rather than a looping video. Whereas a GIF has a noticeable loop as the video begins again and again, therefore there being a jump between the end and start of the video.

Some artists who create cinemagraphs:

  • Julien Douvier
  • Kevin Burg
  • Jamie Beck


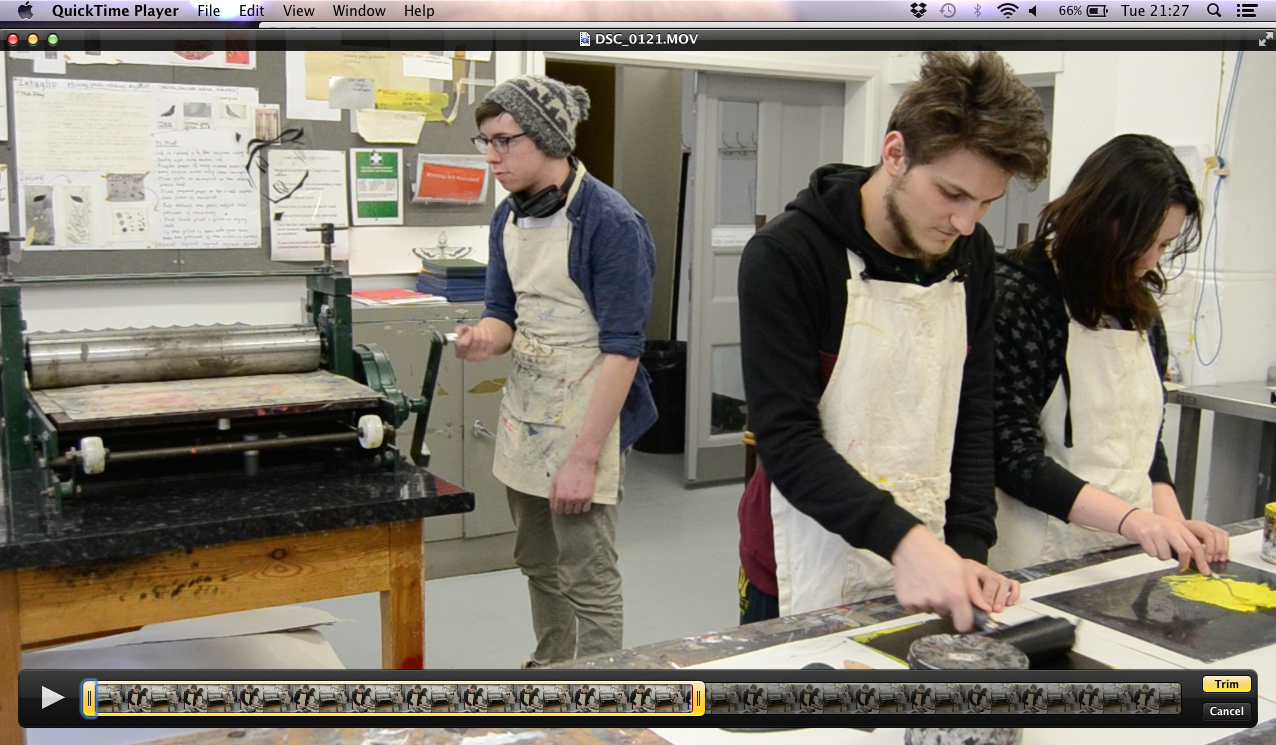
We were set a task to use a pre-made video to make a cinemagraph with. The video was taken of 3 art students from within the college, all of which were doing a monoprinting activity. To make the cinemagraph, we were using a software called Adobe Photoshop CC 2015. There are a set of steps to take, to actually make a cinemagraph. These steps start with the filming of the video footage.

  1. Use a tripod, to set up a still scene. A tripod has to be used to make sure the background behind the subject stays completely still, which will help to make the cinemagraph more successful.
  2. Then make a continuous looping motion, of a predictable and consistent subject.
  3. Find a subtle subject to create the movement with. This creates a massively visual impact, which is much more effective.


After shooting the footage desired for the cinemagraph, it is then all about transforming it within Photoshop. Here are the different stages to creating a cinemagraph in photoshop:

Step 1

Look through all the video footage, and select a small section of it that can be looped, or look natural when reversed. To trim the footage, use Quicktime by going to Edit > Trim, make selection and then save the shortened footage.

Step 2

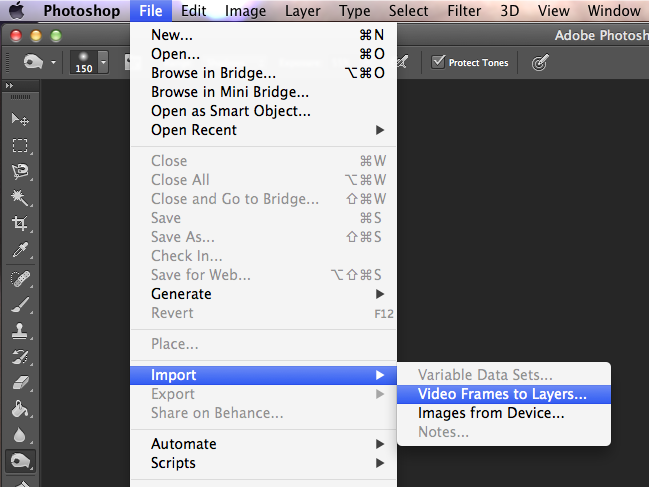
Open Photoshop and go to File > Import > Video Frames to Layers. Leave the default options of “From Beginning To End” and “Make Frame Animation” checked.

Step 3

On the left, it will show you each individual frame has been imported as a separate layer. Generally with cinemagraphs they have to be created frame by frame, but most can be created using a single mask.

Step 4

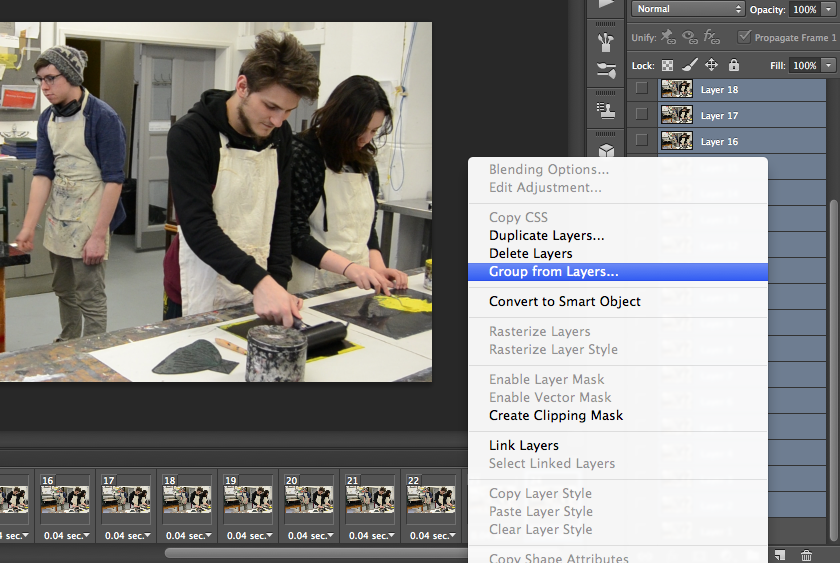
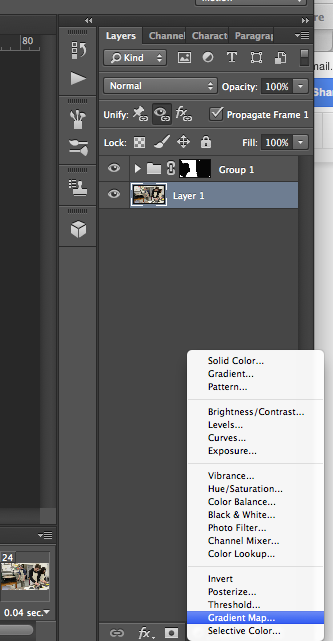
To create a single mask, select all layers except layer 1. Then right click, or control click, and select ‘Group from Layers…’.

Step 5

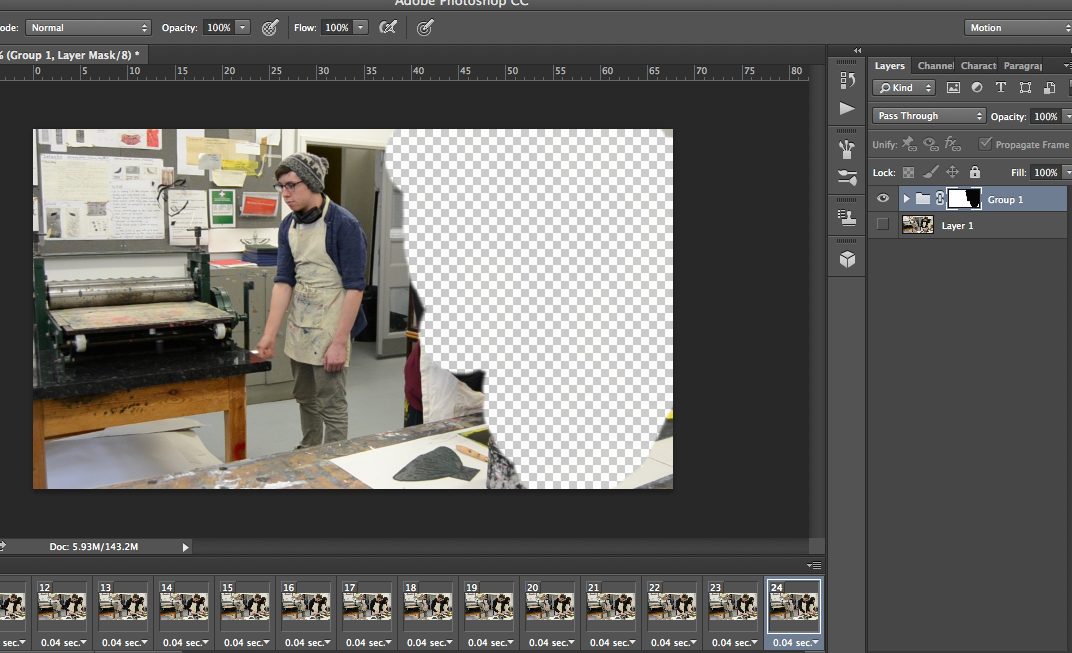
Then you have to mask the frames. By selecting Group 1, and click the Layer Mask icon at the bottom of the layers window. Then select the paint brush tool, and the colour black, paint around the wanted movement. In this case, the desired movement was the student using the printing press. By painting around him, and leaving only the student visible. As you paint, the image will disappear and be replaced by checkered background. If a mistake is made, change the brush colour to white, and the image will reappear. Also make sure all other moving objects are fully covered up, which makes the subject more effective.

Step 6

Open up the Timeline window to see the frames in sequence. You’ll currently see that all but one of the frames have a transparent background thanks to the Layer Mask, to fix this click on Layer 1 and click the Unify Layer Visibility icon in the Layers window.

Click the play button in the Timeline window to test out the basic cinemagraph effect.


Step 7

To make the animation run smoother and more natural, change the pause time between each frame to a shorter time.

Step 8

Now the actual editing of the frames is done, its time to add your own touch by applying filters, layer adjustments and and affects to every frame. It makes the footage more unique to your own style, or adding an atmosphere to create an emotion for the viewer. Put the adjustment layer above the Group Layer in the layer window, this will apply the effect to all layers below it.

The Adjustment Layer options can be found clicking the circle half white, half black, option found at the bottom of the Layers window. All the frames should now be Black & White.
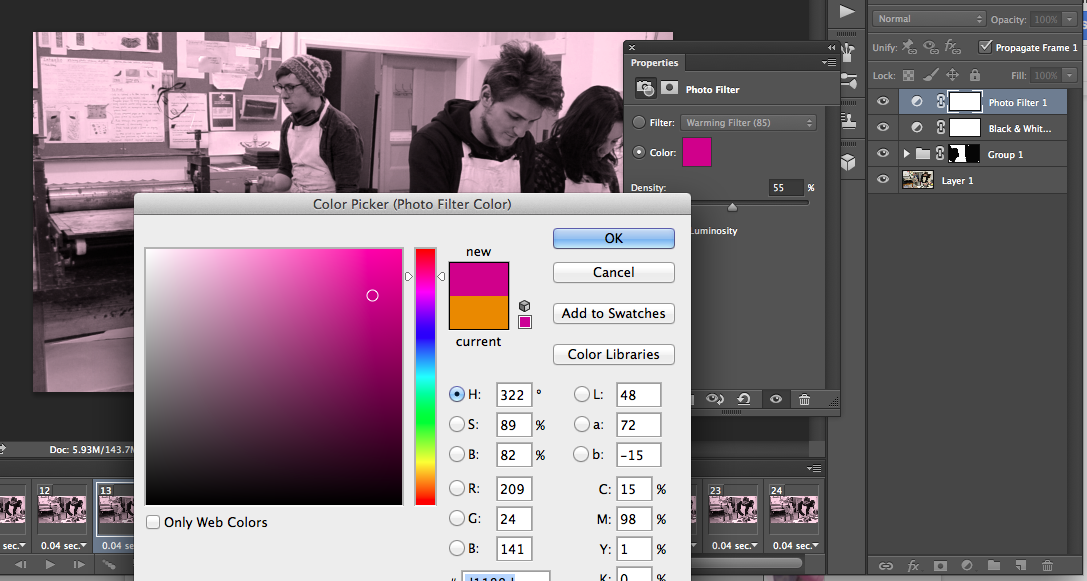
 

Step 9

Now experiment doing the same with the Photo Filter Adjustment Layer. You can use this to apply a colour of your choice over the animation, increasing or decreasing the density.

Step 10

You can also Crop the frame of the cinemagraph, by selecting the Crop tool from the left hand toolbar. Any crop you apply will be added to all your layers.
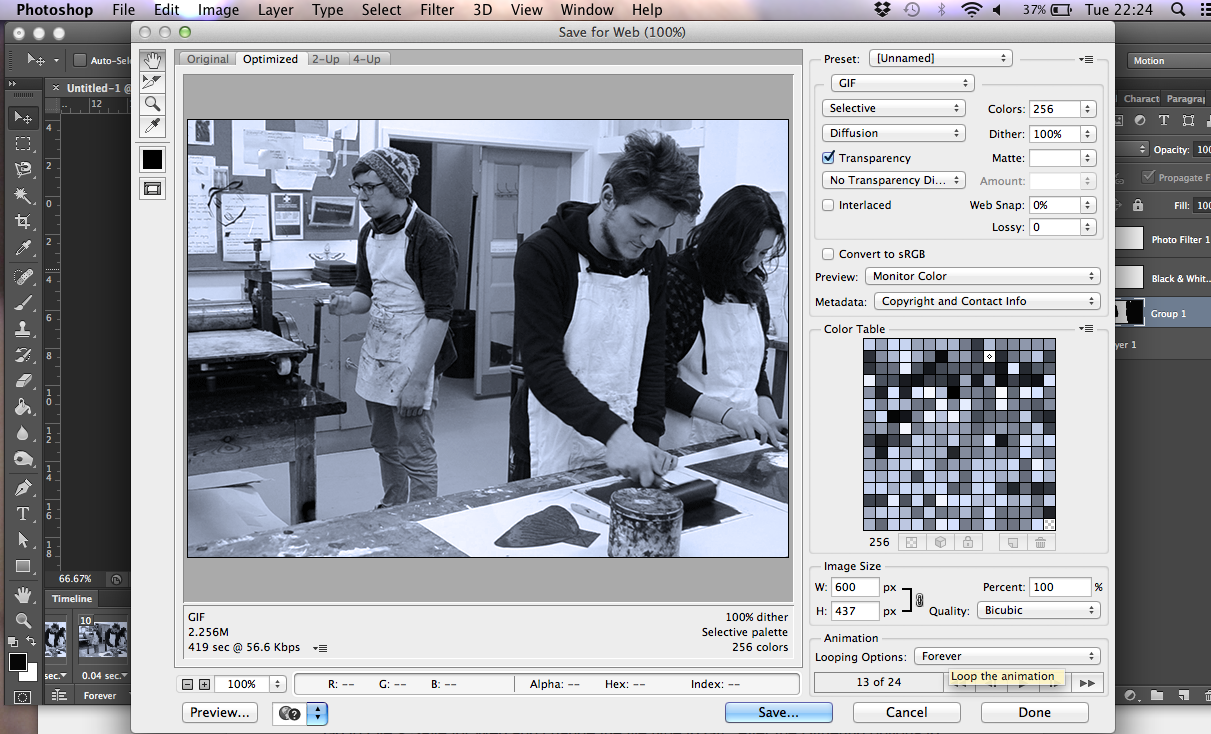
Step 11

An animated image with this much detail will have a massive file size. The best thing to do is to physically reduce the image size by selecting the Group Layer click on Image > Image Size. This will bring up a box like the one below. Make sure each box has the setting like below (Pixels) then make the width 600 and the height will automatically adjust itself. Then click OK. 

Step 12

Then it is time to save your cinemagraph. To do this go to File > Export > Save for the Web and change the file type to GIF. Make sure the Colours option is set on 256 and the Looping Options is set on Forever, then click Save.


Here is the cinemagraph I created:

Lotti


After we created the practise cinemagraph, we were then sent out to get our own footage to make our own cinemagraph. In my group of 4 people, we went out and took 2 different styles of videos. The first video we did was using a student who smokes, and filmed him. We intended to create a cinemagraph of endless smoke coming out of his mouth, however after processing the video, it became apparent that we would not be able to make a successful cinemagraph. This was due to the smoke which did not have a repeating pattern where a smooth loop could be created. It was at this point that we moved on and decided to try another movement to be captured.

Next we decided to get footage of infinite water pouring out of a cup. We had to readjust our angles over and over until we found a successful view point of the cup. This footage was also extremely difficult to make a successful cinemagraph with because the person pouring the water didn’t keep his body and arms still, therefore there was a noticeable jump between the start and end of the loop.

When we were setting up for both of these videos, we thought about positioning, movement, how the movement could be successfully repeated. We did take a lot of time to try to correctly set up and produce a useful video, however it seemed as though the actions we were choosing to do, weren’t easy to create a cinemagraph with. My group worked well together, we all communicated clearly and took different roles to produce the video.

I enjoyed this workshop because I had no idea how simple it is to create a cinemagraph, as I thought it was much more complex using expensive software. However, it can be done on photoshop which I have accessible to me. I also learnt how effective the simplest of movements can be, which made me think about how the finer detail of anything can be really effective. I think I may use this technique again in my future work as it can be really simple to create once I perfect the technique.


Julien Douvier

78847100a9d39716df254316b4744bb6

Julien Douvier is a cinemagraph artist who has really perfected the art of cinemagraph GIFs. I really like his style and how successful each of his cinemagraphs are. I chose the above cinemagraph because I like how simple the image is, and how he has captured movement in 2 ways. The first way is through the obvious movement of the train, and the second way is by the blurred figures travelling through the screen.

I also like the black and white filter on the image, it instantly raises a question about the age of the animation. It seems to me like it could be shot 20 or 30 years ago, but if colour was applied then a modern aspect would reappear. However it can be seen that this is a recently shot clip because the train has a modern build and structure.

Capture Week 1 – Evaluation

This week, we were asked to create our own animation videos in groups of 3 or 4. We were given time over a space of 2 days to learn about animations, and create our own. We were introduced to the process of animation, and the varieties of different versions. Animation is ‘the technique of photographing successive drawings or positions of puppets or models to create an illusion of movement when the film is shown as a sequence.’.

(definition found: https://www.google.co.uk/webhp?sourceid=chrome-instant&ion=1&espv=2&ie=UTF-8#q=what%20is%20animation)

Our task was to create an animation by using the college DSLRs and tripods, setting up a scene, and taking a series of images. We started out by creating a storyboard individually then in our groups. The point of storyboarding was to create our own stories within the animation, then piecing each one together using a final storyboard. A storyboard helps animators to visualise a story, using a set of still images or drawings.

Myself, and my group members worked successfully together as we communicated clearly by listening to each other, advising each other and talking without conflicting at any point. When creating the animation, we each took a role to have throughout the whole animation process. we were advised to alternate jobs, however each of us were really happy with what roles we had, so after making part 1 of our animation, we decided to stay with those roles. My individual role was to take the photos, therefore I sent up the camera and tripod, as my group members set up the scene and the objects we were going to use. However throughout the whole process of taking the photos, each of us would also tweak and help the others by generally keeping an eye on each of the roles and their responsibilities. We were all successful in each of our roles, as we completed a smooth and working animation, without any conflict or disagreements.

I believe the final outcome turned out really well because each of the individual animations worked well, and once put together as one large animation, it flowed and fit together nicely. There were some issues with the final animation. One of these issues was the end of my groups animation jumped a little bit as we began to rush when we were running out of time during the shoot. Another issue were in some of the other groups animations, there was things within some of the images that could have been avoided, such as someones hand appearing in an image. To fix this, we had to delete one image from the animation, which removed the hand. However, the animation still flowed well.

There were some things during the creation process that could have been improved, if we had the opportunity and equipment. Firstly, we didn’t get to edit our animations individually, as there wasn’t software for everyone to use. Another issue was having to touch the camera throughout the whole animation to take each of the images, whereas a remote or computer connection would have worked better by reducing the vibrations and movement of the camera.

I would most definitely like to use stop motion again, as it is fun to set up and create. I would like to improve my animation skills by using those softwares to create the pieces, as well as learning little tips and tricks to creating a successful animation. I think it is an interesting and unique way to present work.

I believe I learned a lot during this workshop. I learnt about new programs and softwares, along with a process of bringing images to life. I also learnt about the different kinds of animation, and the artists. I believed animation was a digital process, however this week has taught me that it is not only digital but there is still a less digitally based process using props and physical effort from an animator.

Walt Disney – Artist Research

Walt_Disney_1946
Walter Elias Disney, born 5th December 1901 in Chicago, Illinois  U.S, is the Co-founder of The Walt Disney Company along with his brother Roy O. Disney. He was an American animator, entrepreneur, cartoonist, voice actor and film producer. He is largely noticed as a cultural icon and has influenced and contributed to entertainment during the 20th century. Himself, and his staff, created many favourite and well known fictional characters such as Mickey and Minnie Mouse, Donald Duck and Goofy, which featured in some of his numerous animated and feature films.
Educated at McKinley High School and then at Chicago Academy of Fine arts. Walt attended the new Park School of Marceline in fall, 1909. And in 1911, Walt and his sister Ruth attended The Benton Grammar School in Kansas City.
He won 22 Academy awards and received 4 honourary academy awards from a total of 59 nominations throughout his lifetime. He has received more Oscar awards and nominations than any other individual in history.
Throughout his teenage years, he was aware of his artistic passion, however, he was unaware as to which aspect of art he was aiming to gain a career in. He considered becoming an actor, then began to draw political caricatures and comic strips for a newspaper but nobody wanted to hire him. Eventually he began creating advertisements for all kinds of newspapers, magazines and movie theaters at an art studio. After this his career began to lift off from here, as he met new people, creating businesses and companies in partnerships, and becoming more known. Soon he began to make american commercials based off cut-out animation, which led to Disney becoming very interested in animation which lead to his decision to become an animator. After many other failed attempts at opening other studios and business, Disney finally created his own animation studio in Hollywood, California in 1923 which was the beginning of the success of his career. Eventually followed by the other massive success of his lifetime which was the creation of the first Disneyland theme park in 1955.
 disney-on-dreaming-walt-disney1
Disney later died on December 15th 1966 in Burbank, California U.S from Lung Cancer.
(the above information is sourced from: https://en.wikipedia.org/wiki/Walt_Disney which was then pulled apart and rewritten by myself)

Disneys process of creating his animations are as follows:
1. A storyboard is created, where all the animators and directors come together to create and discuss the entire film. Usually many storyboards are made as drafts, then a final storyboard will be completed.
2. The storyboards are presented as the story.
Walt-Disney-11
3. Once the story is laid out, the dialogue is recorded. This is done before animation, so the animators know what the characters will say.

4. After the dialogue is recorded, the animators can make rough sketches of just the characters. Usually these drawings are quite messy, there is still no color, or background. Some animated films have used over 50,000 individual drawings. (At most animation studios, the best animators only sketched a few animation drawings, leaving gaps in between. Later on, a person called an “inbetweener” would finish the scenes, by drawing in between the areas that the animator had left)

5. Once the entire film has been drawn on paper, the animation drawings go to the inking department. There, the inkers copy the animation drawings on to a clear celluloid acetate, sometimes called a Cel.

6. After the outline of the characters has been made, the unfinished Cel’s go to the Painting Department. The painters flip the Cel over, and paint the colors on the back. They paint on the back so the characters appear crisp, and have an outline.

7. Before the Animation Cels get photographed a background must be added. Because a Cel is clear, and it only has the painted character on it, if a background is made, it will show through. Usually backgrounds are painted with Tempera or Water Color paint. Although, in some Disney productions, the background was painted on glass, and combined with other glass painted backgrounds to create the illusion of extreme movement. (This technique is use in Snow White and the Seven Dwarfs.)

8. Now all the combined elements (the Cel and the background) can be photographed. Although, the final product is not filmed with a normal projector, or camera. A special device, with a lens mounted facing down on to a table top captures each frame of the animated feature. Usually, the background is placed into a special mount, then covered with the Cel, then covered with a large piece of glass, then photographed.

9. After all the drawings have been filmed, the dialogue is added. Sometimes the film is edited at this step.

10. Then animated film is released, and the general public may view it.

(above information sourced from: http://www.justdisney.com/animation/animation.html)


Since Walt Disney’s death, The Disney company animations have continued to develop, progress, and improve massively. The company has become extremely popular and known. The image quality and creation techniques have improved considerably, making characters more realistic. In recent years, Disney has progressed into 3D animation, which has lead to an increasing fan base, as young generations are still as interested as those years ago, therefore all ages are keen and interested on the company and its productions.

The importance of storyboarding

A storyboard serves a purpose of putting down the initial ideas an animator has in the form of illustrations displayed in a sequence to assist the pre-visualisation of a motion picture or animation.

My storyboard was both successful, and unsuccessful as there were parts of it that turned out well, and some things that didn’t turn out so well. I was using my storyboard to create my own section of a group animation. The things that were successful about my storyboard were I was able to plan exactly what I wanted my part of the animation would turn out like. This was successful because I could see how I wanted my objects to move and rotate within the animation. I could also see how my objects would progress and move. My storyboard turned out unsuccessful because as I was creating it, I didn’t necessarily think about how big the objects we were using would be, therefore I drew a lot of little ones to make my progressing shots, when we actually used much larger objects in the actual animation. I could have helped this by finding out what sized objects we were actually using for our animation, yet I didn’t think about it at the time.

wp-1456407923723.jpg

Next time I create a storyboard, I would use more than 6 boxes, so I can really see how many stages I have for my animation. I would also write down more description about each of the stages and add more detail about how I wanted the piece to look. Along with these, I would take more time with the drawings, to make them much more realistic and visually recognisable.

I think it is very important to plan through drawing before creating an animation because doing it really helps the artist to visualize their thoughts. It is also important because then the artist can see what steps they are going to have to take when taking the imges for their animation.

Here are some storyboards created by other animators:

storyboard 1

I chose to talk about this storyboard because I like how there is a large amount of detail in each box. They are all filled with enough description to inform anyone who looks at it of what the artist wants to happen throughout the animation.

EPSON scanner image

I also chose this storyboard to talk about because it is recognisable. The character in the illustrations is Pinocchio. This storyboard has a large amount of realistic detail put into each stage. There is also a considerable amount of writing underneath each image which helps readers to visualise the animation, as well as the animator being able to refer back to the storyboard for assistance when creating the animation.


Creating a Stop Motion animation

Today we began creating our animations that we planned yesterday. The class had been split into 4 groups, each group has 3-4 people in it. Each person was asked to think about, plan and storyboard their own part of the animation, therefore each group would create a animation of 3-4 peoples different animations combined into one. Then each groups animations were attached together to create one large animation to be displayed in the college museum.

We were given a brief explanation into setting up DSLR cameras, tripods and the animation scene. We were advised to use the Automatic setting on the camera, unless we were extremely confident in using Manual settings. I chose to use the camera on Manual setting as I wanted to change the shutter speeds and white balance of the camera to suit the scene. I also knew how to set up the tripod therefore arranged it for our scene also. To set up our animation scene, myself and those in my group placed a brown board down onto the table, attached it to the table using masking tape. Then once the camera was set up, we then had to adjust the board so the whole frame contained only the brown board. We did this because we didn’t want any  image pollution such as the table, tripod legs or the camera strap. To mark the outline of the frame, we stuck masking tape across the board where the image went out of frame. We did this because we wanted to make sure we placed the shells within the frame.

Here are some images of our set up:

imageimageimage

We selected a box which had a variety of different coloured shells, but they were all the same style shell. We then used our story boards to remind ourselves of how we were going to do each of our animations. The 3 of us in my group each took a role that we were comfortable with. I decided to be the person to press the shutter button and keep an eye on the cameras positioning, settings, and battery level. One of the other members of my group chose to be the director, and keep an eye on the storyboards therefore helping us to follow the correct plans and designs. Then the other member of my group chose to move the shells between each image. We all also decided to contribute a variety of ideas and improvements throughout the whole process of creating the animations.

Overall we took a total of 186 images throughout the whole of our animation.

Whilst creating our animation, we encountered a variety of problems. Firstly we had a starting issue of being too close to all the other groups. We were tightly packed into a classroom with each group working right by another. This caused a problem because it was easy to knock or move another groups equipment. Another issue was other students were creating shadows onto their own, and other groups, scenes which the cameras could pick up. To fix this, we should have found another room where 2 of the groups could have gone to create their animations therefore having more room. Secondly we needed a controlled lighting environment. A major issue was the room was mainly lit from the natural light coming through the windows. We did used artificial lighting to light up the main scene, however the outside light did affect the set-ups slightly. To fix this, we could have used a dark room, and only lit up the scene using artificial lighting, therefore the light levels will stay constant. A third issue we had was the batteries running out on our camera. I kept a constant eye on the battery level, therefore as it ran low, I was able to change the battery without data being wiped off the camera.

After we created our animation, the images were handed to our tutor, who then pieced together every image and made one large story with all 4 groups images, on iMovie (a apple movie editing software). Other softwares that can be used are: Pro animate, iStopMotion and Dragon Frame.


Once the images were pieced together, and we watched the animation, we had to decide on music to go over the video. We looked through a variety of soundtracks that the software supplied and chose one called “Peach Cobbler”. This fit each groups part of the animation really well.

Here is the final animation: